They say it takes about 3 years to normalize a classroom. I definitely feel so much better the second year when it comes to prepping the classroom. Last year, I spent most of my time really cleaning our bedroom, washing the carpet, buying all furnitures & plants, reorganizing the massive amount of resources I had that were dumped in way too many boxes. I had the skeleton of the shelves up. But my shelves were meager. And by the end of the school year, they were a mess as I piled one new material on top of another or put knickknacks on top of the shelves. A teacher is supposed to clean and prep the classroom once a day, I couldn’t find the energy for it.
This year, the school room has been slightly re-arranged. I bought a LOT of new math, geography, and language materials. It’s still no where close to being complete! One lesson I learned last year is that advice I heard from a fellow teacher but never followed: If there is a chance to buy a material, just buy it. There are lots of other opportunities to make your own and plan curriculum. I also brought a new shelf in and redesigned the shelves.
Before the tour, here are two other posts on Montessori classrooms that I like and used as reference: What Did We Do All Day and Montessori Homeschooling. They’re definitely more like the traditional Montessori classrooms I’ve seen.
General Layout

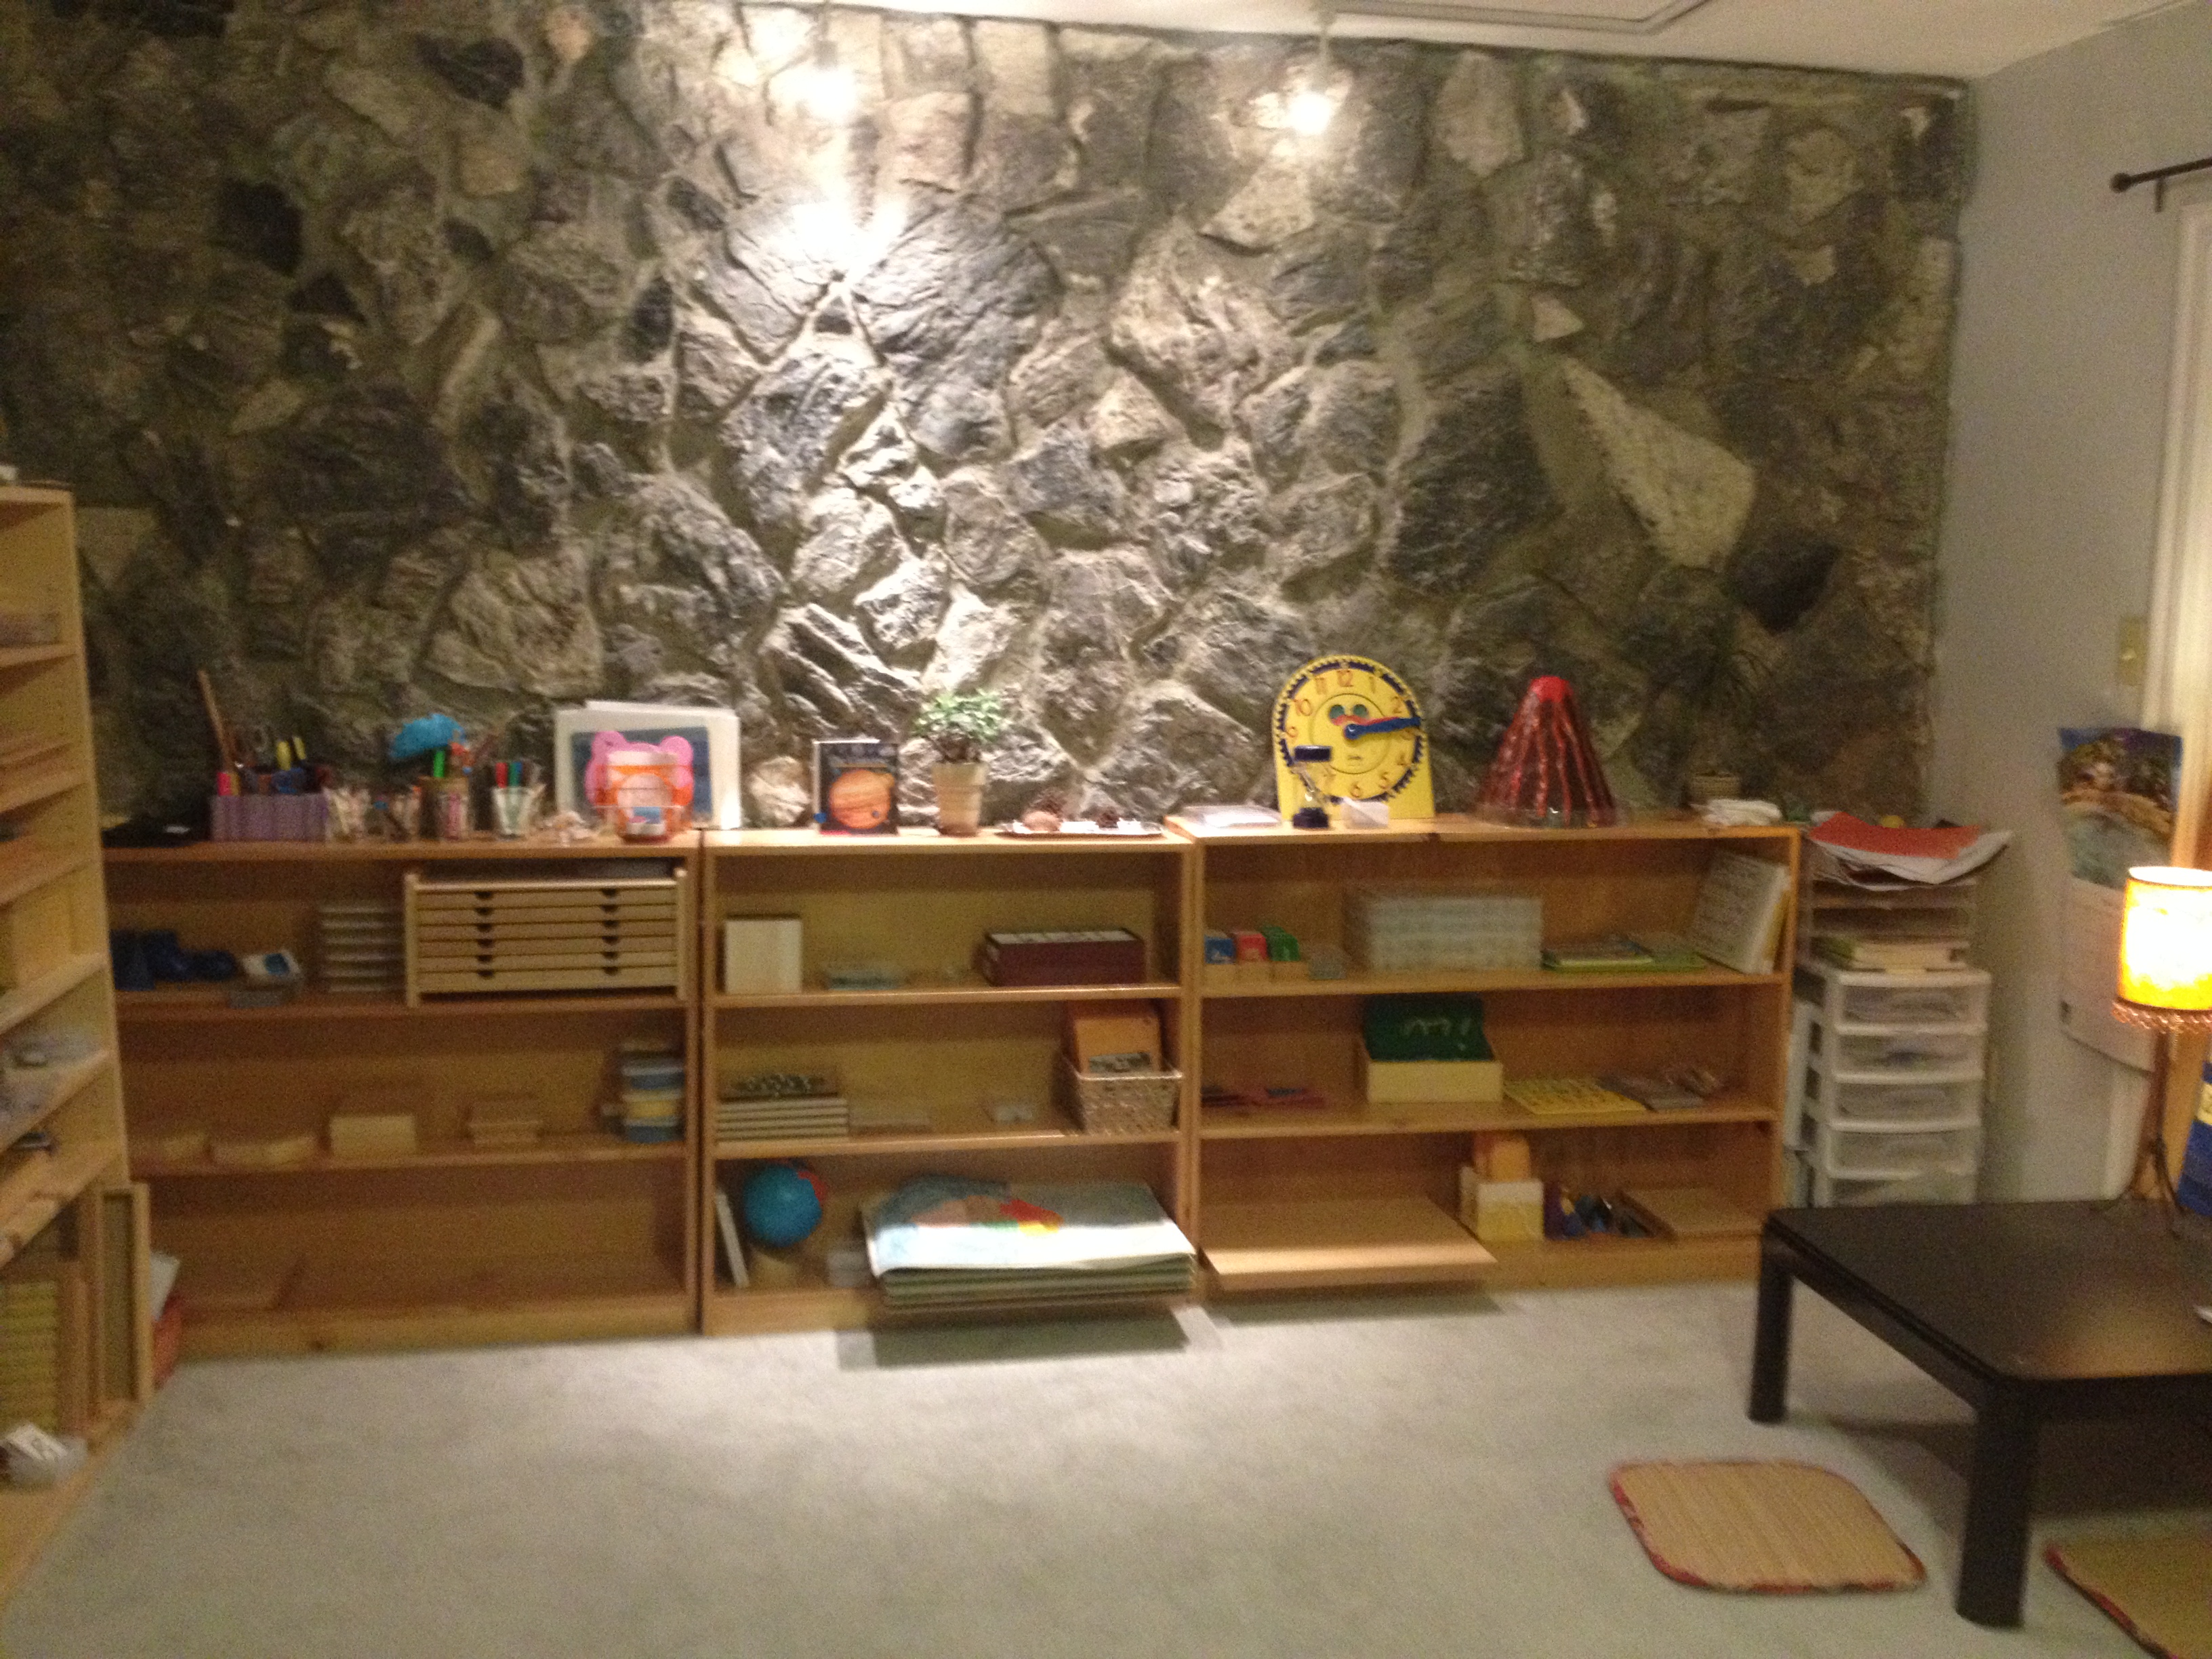
My classroom is pretty tiny. It’s only half of a super large master bedroom. The shelves for books and all my supplies are in the large Family Room that’s directly next to the MB. This is a pic from a corner of the classroom. Walking clockwise from 7 o’clock, you have:
- Pet shelf
- White Math 3-foot shelf #1 (Ikea Billy)
- Math shelf #2 (local carpenter, 3′ x 5′)
- Geometry shelf (local carpenter, 4′ x 3′)
- Science shelf (local carpenter 3′ x 3′)
- Language shelf (local carpenter 4′ x 3′)
- Cubby
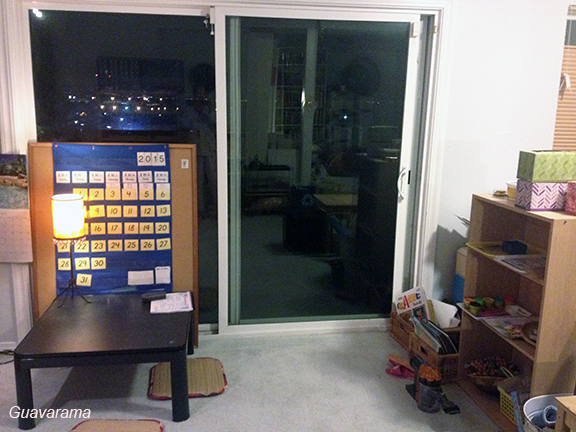
- Japanese kotatsu, large bulletin board
- Small reading area (not pictured)
- White Art/Practical Life shelf (not pictured)
- Rug basket (not pictured)
- Ikea small desk
Alternate Views

Sometimes I feel like I don’t have enough shelf space, other times I see empty gaps. It kind of all depends on how you want to stack your materials. In re-arranging I considered piling the materials a bit more ala What Did We Do Today. But, I think I need the order to know the progression in material presentation since I’m still not 100% familiar with the curriculum. I also tend to start dumping when things are piled.
Other than math area, I re-designated all the other shelves because I added so much more math materials and I really wanted to get into Geometry this year since we didn’t really touch it last year. I’m still thinking about a map cabinet, but honestly I don’t know where it’ll fit.
Traditionally, materials on the shelf are arranged left to right, top to bottom in order of difficulty. The order mimics the way you read. Art and Practical Life area are typically close to the sink, and the math area farthest from the door because beads otherwise get lost. The shelves themselves are also always just child-height. Lastly, there is usually not that many things on walls. My stone wall wouldn’t allow it anyway.
I’m also learning you can do the same thing with a Ikea Ivar shelves. The materials aren’t too heavy typically so you could buy more Ivar shelves than what’s sold. Since I’m used to the much more traditional wooden furniture in the classroom, I’m definitely partial to its looks. Most shelves and tables I’ve had since the kids were young because I wanted real wooden shelves and getting a carpenter to do it was cheaper. Of course I’m doing the more cheaper route now a days so I’m just sticking with Ikea furniture. This past year I bought the 2 white shelves from garage sale.
I agonized over how to organize the shelves last year since the kids are in two different developmental stages. Do I organize by area or by kid? Do I buy ALL the materials I need? There’s no way I can fit it all in. At the end I realized that since they are exactly 3 years apart, it just means my materials have to span about 3 years. For example 1st year of primary to 1st year of elementary, 3rd year of primary to 3rd year of elementary, etc. It has not turned out to be exactly the case as Astroboy is faster on the math front.
Because I moved a new shelf in, I also agonized if I should split the empty floor space in the center of the room up. But I realized I can’t because math work always takes up so much space on the floor. I will eventually expand the classroom size I think and take over the other half of the room.
Details Details
Math shelf #1
- fraction skittles
- stamp game
- Golden bead materials
- Numbers and counters (for learning odd and even and will be rotated out)
- Positive snake game
- Addition and subtraction strip boards, plus memorization charts
- Multiplication board
- Division board
- Number rods
- Binomial & trinomial cubes
- Science posters
The order of difficulty are a bit off because the number rods will go away eventually. The rods are for addition rather than counting (which would have necessitated it going on top shelf) and I wanted to review odds and even before I take it out. This is primarily Astroboy’s shelf so the more advanced stuff (fraction & stamp game) are on the top since we won’t get to it yet. Last year Astroboy spent most of his time on counting, so this year I wanted to concentrate a bit on the operations and memorization as I see him doing that outside of school, adding to himself, that’s what most of these materials are. You can see that we have different “types” of Golden Bead material. Such a no no. But I’m putting it on the shelf for now till we actually use the golden beads to see if we need the paper version. Last year I was all set on making paper versions but decided to splurge once I realized the Golden Beads are used in Elementary as well.
Behind the shelves there is a small space and it’s where I store my huge posters for science presentations.
Math shelf #2
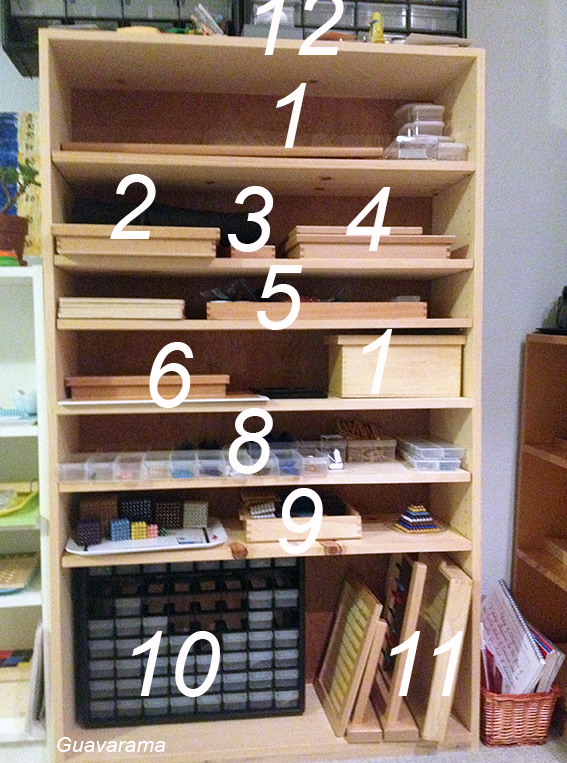
- Fractions, metal insets + cutouts
- Decanomial bead box + checkerboard (for multiplication)
- Arithmatic signs
- Bank game + pegs for pegboard (for multiplication, factors, multiples)
- Racks and tubes (for division)
- Fraction board and pieces
- volume set
- bead chains (squaring and cubing, skip counting)
- Squares and cubes (squaring and cubing, primary math)
- Math equation slips
- flat bead frame, short bead frame, long bead frame, tray for golden beads (operations)
- Teacher mini drawers
I got this new shelf last year because I kept running out of space and needed a teacher’s area. I don’t regret buying the shorter shelves but it is so nice to have teacher space on a shelf.
For Thumper, this year I think I will try to finish multiplication, start division, fraction and decimals. But the focus will be on squares and cubes because I see her really interested in these work. Last year she started using the flat bead frame.
As you can see, I have no bead cabinet. I just don’t have the real estate for that shelf. I researched and understand why I want to have that shelf. But until I organize the other half of the MB, I don’t think I will spend money on it. I struggled with whether or not to move this to Astroboy’s shelf since he’s skip counting, but ultimately decided not to because I know Thumper will be doing a lot of work in this area this year.
The little drawers i bought because of the what Did We Do All Day blog, but I have not had time to fill it with much. It’s where we keep the dice and some equations. When I have time, I may go to Walmart to find those little 5 drawer mini-drawers and put the metal insets and the beads in there. I know I’m still missing word problems and more printouts.
The top of the shelf are my dumping ground. I’ve got my chinese flash cards on the left black mini drawers and miniatures for phonics in the right black mini drawers.
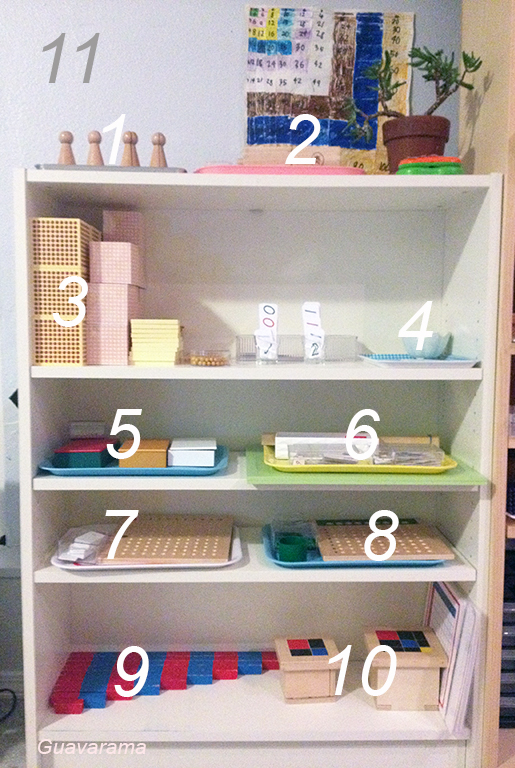
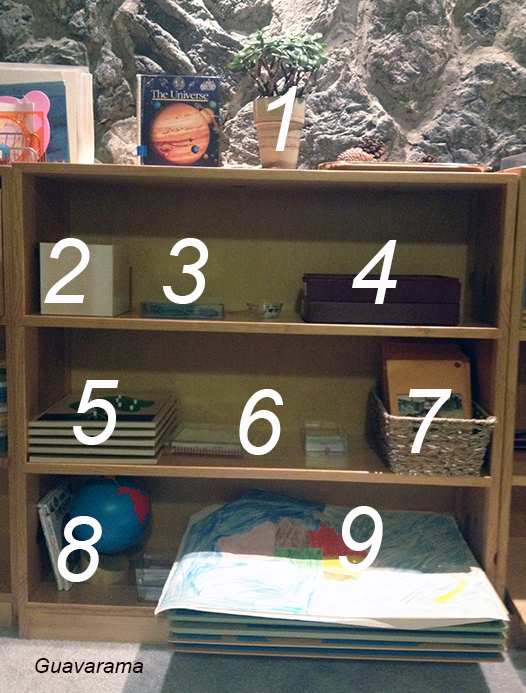
Geometry Shelf
- Geometric solids
- Geometric cards
- Geometric cabinet
- geometric shapes
- tessellation set
- Geometric sticks
- writing supplies
- English reading material
We didn’t really touch on geometry last year except maybe 1-2 presentation for each material. I really need to work on my presentation skills I think. But that’s another post.
Because this used to be the language shelf, I have all the writing materials on top. I didn’t move it to the top of the new language shelf because 1) the children by habit are going here, 2) I needed more space for language stuff. There is also that little basket of her phonics reading which again stays where it is due to lack of space and habit.
The writing materials are: Chinese brushwork, colored crayons, colored pencils, colored markers. white board erasers, papers of various kinds. There is only 1 copy of each colored writing utensils. There are multiple pencils.
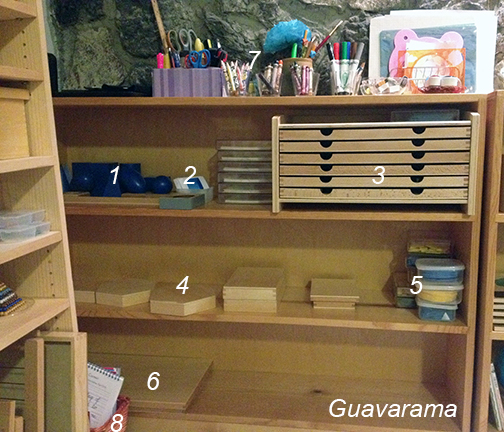
Science Shelf
- book + plant + nature tray
- Nesting boxes
- Solar system nomencalture
- Rocks
- Botany puzzles
- Botany+Zoology nomencalture cards
- Art basket
- Books for geography + Colored globe
- Maps
This is a mishmash till I get more materials. After studying the two other bloggers, I wanted a botany shelf, a zoology shelf and a geography shelf, plus put primary stuff (rocks, land forms) on top. But I don’t have the materials and my art shelf isn’t ready so things got squished. Looking at the two blogs I also realized science is a bunch of nomenclature, other than geography.
I want to get some scientific materials like microscope, things you need for experiments, etc. Who knows when that’ll get done.
Language Shelf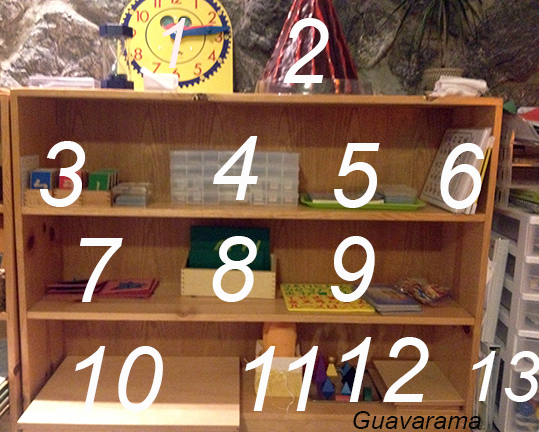
- Clock work (on wrong shelf)
- Volcano (on wrong shelf)
- zhuyin sand paper letters
- zhuyin moveable alphabet + Chinese dictionary
- Sagebook for Astroboy
- Sagebook related games for Astroboy & Whiteboard
- metal insets
- Double cursive sandpaper letters (waiting for the regular one from friend)
- dump area.
- Moveable alphabet
- sight words
- grammar
- Kids cubby and writing paper
We’re studying 2 language at once so we really are short on real estate. But thank goodness I don’t have all the stuff made yet. Since Thumper is done with Sage, we don’t have her sage stuff out. This year, I want to focus on sage and zhuyin for Astroboy, and for Thumper it’s time to start on grammar.
The meta insets are like that because they take up so much space otherwise. I found a blog online of someone who stored it in 2 5-drawer mini drawers. I’m waiting to find time to go to Walmart to buy it. (See, a great example of how it just takes so long to prep for me)
The kids have a 5 drawer cubby where they put work they’re currently working on. Worksheet and work plans go in a binder that’s stored in the little space between the cubby and the language shelf. On top are 4 shelves for paper of all kinds. The paper needs are super great so I will reorganize this too one day.
Other stuff
This is Thumper’s Japanese kotatsu. In the winter we put a blanket over the desk and there’s a heater underneath the table. We started last school year with 2 regular wooden tables. It’s turned out better that each kid have their own work space as Thumper has a penchant for spreading out. The bulletin board is double sided with bilingual Mandarin+English calendar on one side and white board on the other. On the right are the art and Practical life shelf, 2 reading baskets (one for Thumper and one for Astroboy), rug bin, and Astroboy’s table (not pictured). The reading baskets should have books current to what we’re studying, but the kids never touch it so I’m rethinking placement. That is also why there are now books on top of science shelf instead.
I’ve also talked about our reading area bookshelves before. I have a third English bookshelf I never use which you can see on the left side of this pic. Next to this shelf are my 12 clear bin worth of supplies and materials. Oh, and lastly I repurposed a 3 drawer dresser for trays and bowls we use often. All super messy still so I’m not taking a picture. We also have our fish and my botany experiment upstairs.
Going back to what I said earlier, I’m much happier I bought a bunch of materials this year. Montessori materials cost a lot of money. And when I first started, I was wishy-washy on whether or not to buy, with the thought that I will buy when I see the kids need it.; and making the rest, especially paper-based stuff. Plus, the kids can make the material and learn! (I attempted with the land and water forms) I’m still mostly going that route, partly because there are no Chinese materials. I realized that with my penchant to over commit myself and never having time to prep, or having time to buy the materials we needed to make things because it’s so hard to find that perfect material, it was much better to buy. I cannot wait until the kids are ready to learn to buy, the interest may be lost by the time I get the material. Already I feel like there’s a never ending quest to find that perfect container because I didn’t want to spend money on traditional stuff. It took me 4-5 tries to find the Daiso plastic containers that is now housing our bead arrows. Time perhaps I could have spent on prepping my Chinese materials…….


These photos are so helpful, as is your detailed post. I have read this same post several times for all of the great ideas!